Is the subject sitting at the intended brightness?
01Primary correction
Build the base before the look.
Primary correction establishes the image's foundation: exposure, white balance, contrast, and saturation working together before the creative grade begins.
COLOR PAGE • PRIMARIESDELIVER • H.264
THE CORRECTION LOOP
01READWhat is the image doing?
02BALANCEWhat needs to be corrected?
03VERIFYDoes the shot now support the story?
THE RULE Balanced does not mean bland. It means your creative choices have a stable foundation.
02Primary correction
Correct the whole image before isolating its parts.
Primary controls have broad influence across the frame. They are the fastest way to establish a coherent starting point before windows, keys, tracking, or selective fixes.
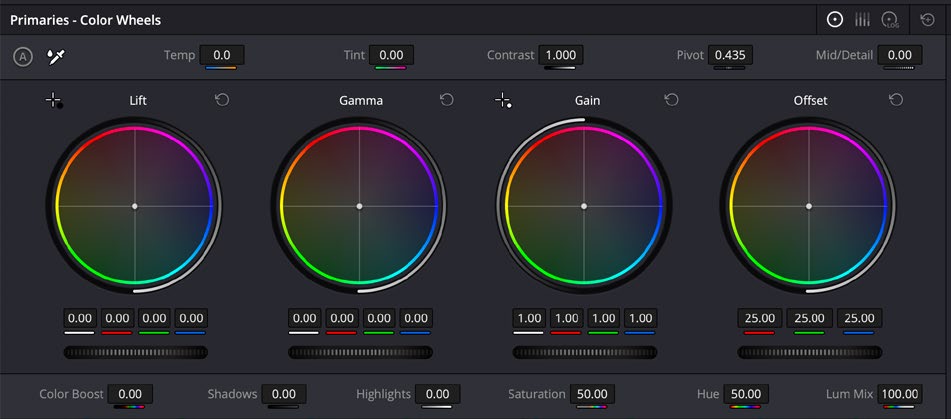
Are neutrals and skin carrying an unwanted cast?
Do shadows, midtones, and highlights have the right separation?
Does the amount and distribution of color feel intentional?
START BROAD. If one global adjustment can solve the problem, do that before building a complicated isolation.
Source: The Colorist Guide to DaVinci Resolve 20, balancing footage03Contrast + slope
Contrast changes the slope. Pivot chooses where it turns.
On a tonal graph, contrast is the steepness between dark and bright values. A steeper slope creates more separation; a flatter slope compresses the image.
Darks and brights move apart. The image gains depth, clarity, and weight.
Values move closer together. The image feels softer, flatter, or more restrained.
Move the pivot to decide which part of the tonal range receives more emphasis as contrast changes.
BEFORE THE CONTROLShould the scene feel open, dense, soft, graphic, delicate, or forceful?
Source: The Colorist Guide to DaVinci Resolve 20, Contrast and Pivot04Types of saturation
Not every saturation control distributes color the same way.
The goal is not simply more or less color. Choose a control based on which colors—and which parts of the image—need to change.
Raises or lowers color intensity across the image without selecting a hue, luminance, or existing-saturation range.
A non-uniform operation that changes low-saturation regions more strongly than regions that are already highly saturated.
Uses existing saturation as the horizontal key, letting the curve change selected saturation ranges.
Uses luminance as the horizontal key, letting the curve change saturation at selected brightness levels.
Global Sat changes color intensity in the HDR palette's perceptually uniform processing space. Zone Sat limits the change to an overlapping tonal zone.
HSV separates Hue, Saturation, and Value. Set the node to HSV, turn off Channels 1 and 3, then use the Gamma wheel to raise or lower the remaining Saturation channel.
DO NOT CONFUSE THE METHODSHDR Sat is a built-in palette control. HSV saturation is a custom node-channel technique—not a separate Resolve slider.
WATCH THE EDGES. Excess saturation can create clipped-looking colors, noisy shadows, brittle skin, and distracting highlights.
Source: Resolve 20.3 Reference Manual, primary and curve-based saturation controls Source: Resolve 20.3 Reference Manual, HDR Palette Source: Resolve 20.3 Reference Manual, node color spaces and channel controls05Linear math
Exposure scales light. White balance scales channels.
Thinking in linear-light relationships helps explain why exposure and white balance belong near the beginning of a correction: they reshape the captured signal before creative contrast and color styling.
½×1×2×
Exposure is multiplicative. Equal stop changes represent equal ratios of light—not equal-looking moves on every display-referred image.
RGB
Temperature and tint rebalance channel relationships so neutral objects and skin sit in the intended color context.
FOUNDATION ORDERExposure + white balance→Contrast→Saturation→Look
ORDER IS LOGIC, NOT DOGMA. You may revisit every control. The sequence simply makes cause and effect easier to read.
06Balanced base grade
A balanced base removes distraction without removing intention.
The base grade creates a dependable version of the shot: readable, technically coherent, and ready for a look. It should preserve the scene's time of day, lighting direction, and emotional bias.
Describe the problem before touching a control.
Apply the correct input transform or LUT only when the source requires it.
Place the subject and remove unwanted color bias.
Set density, separation, and the image's tonal slope.
Build color intensity that supports the scene.
Check faces, neutrals, shot relationships, and scopes.
BALANCED ≠ NEUTRALIZEDA warm room can stay warm. A dark scene can stay dark. Correction protects the intended condition of the image.
07Workflow logic
A node tree is a sentence. Make the order readable.
Each node should have a job you can name. A clear tree lets you diagnose, revise, copy, and repeat a grade without guessing what each adjustment is doing.
NAME ITIf you cannot name the node's job, its purpose is probably unclear.
ONE JOB FIRSTSeparate major operations until combining them genuinely improves the workflow.
ORDER MATTERSEvery serial node receives the result of the node before it.
KEEP IT BORING. A clean, repeatable node tree is more valuable than a complicated tree you cannot explain.
Source: The Colorist Guide to DaVinci Resolve 20, managing nodes and grades08Hands-on grade
Build one base grade. Then prove it travels.
Use a short scene with several related shots. Correct the hero shot first, copy the structure, and refine each shot rather than starting from zero.
01HERO SHOTBuild the clearest representative grade.
→02COPY STRUCTUREApply the node logic to related shots.
→03MATCHRefine exposure, WB, contrast, and saturation.
→04PLAYBACKJudge the sequence—not isolated thumbnails.
VERIFYCan you move through the scene without a correction calling attention to itself?
09Delivery page
Export a review-ready H.264.
The Deliver page turns the timeline into a file. For this exercise, make one H.264 movie that is easy to upload, review, and play on common devices.
RENDERSingle Clip
FORMATMP4
CODECH.264
RESOLUTIONMatch Timeline
FRAME RATEMatch Project
AUDIOOn • AAC
OPEN DELIVER
Click the rocket icon at the bottom of Resolve.
CHOOSE SINGLE CLIP
Export the finished timeline as one movie file.
NAME + LOCATION
Use a clear filename and browse to a folder you can find.
SET H.264
Format: MP4 • Codec: H.264 • Match the timeline resolution and frame rate.
CHECK AUDIO
Export Audio on • Codec: AAC • Use the timeline mix.
QUEUE + RENDER
Add to Render Queue, select the job, then Render All.
H.264 IS A DELIVERY FILEIt is not your Resolve project, project archive, source media, or high-quality preservation master.
WATCH THE FILE. Open the exported movie outside Resolve and check the beginning, middle, end, picture, sound, frame size, and filename.
Source: Blackmagic Design, Media and Delivery Source: The Beginner's Guide to DaVinci Resolve 2010
END OF CLASS
Balance it. Structure it. Deliver it.
01Primary correction starts with broad image relationships.
02Contrast changes tonal slope; pivot changes its balance point.
03Saturation tools distribute color differently.
04Exposure and white balance establish the foundation.
05Node trees should make workflow logic visible.
06Always verify the exported H.264 outside Resolve.
HANDS-ON OUTCOMEA balanced base grade with a readable node tree and a verified H.264 review file.
COURSE HOMEReturn to class guides→Sources + image credits
Interface images are educational excerpts from official Blackmagic Design training and reference materials.
The Colorist Guide to DaVinci Resolve 20 ↗The Beginner's Guide to DaVinci Resolve 20 ↗DaVinci Resolve 20.3 Reference Manual ↗Blackmagic Design: Media and Delivery ↗DaVinci Resolve is a trademark of Blackmagic Design. This course reference is not an official Blackmagic Design publication.